Authorization flow
Overview
The OAuth2 API authorizes a client application and allows it to access a protected resource on a resource server, i.e. a site. The Authorization Server is responsible for issuing Authorization codes and Tokens, that will be used to authenticate the user in the target site. If you’re not familiar with the OAuth2 protocol check out this page for a step by step reference or Aaron Parecki’s “OAuth 2 Simplified” guide for a more comprehensive guide.
Authorization flow
📘 Marketplace Example
For the sake of example, we will be referring to OLX Romania as the Site where users will authorize your application to access their accounts.
To see currently available sites, visit Supported sites .
After storing the Client ID and the Client Secret that was provided to you in a safe place, it’s time to authorize an application user on the site.
The following image shows every step that is performed in the OAuth2 process:
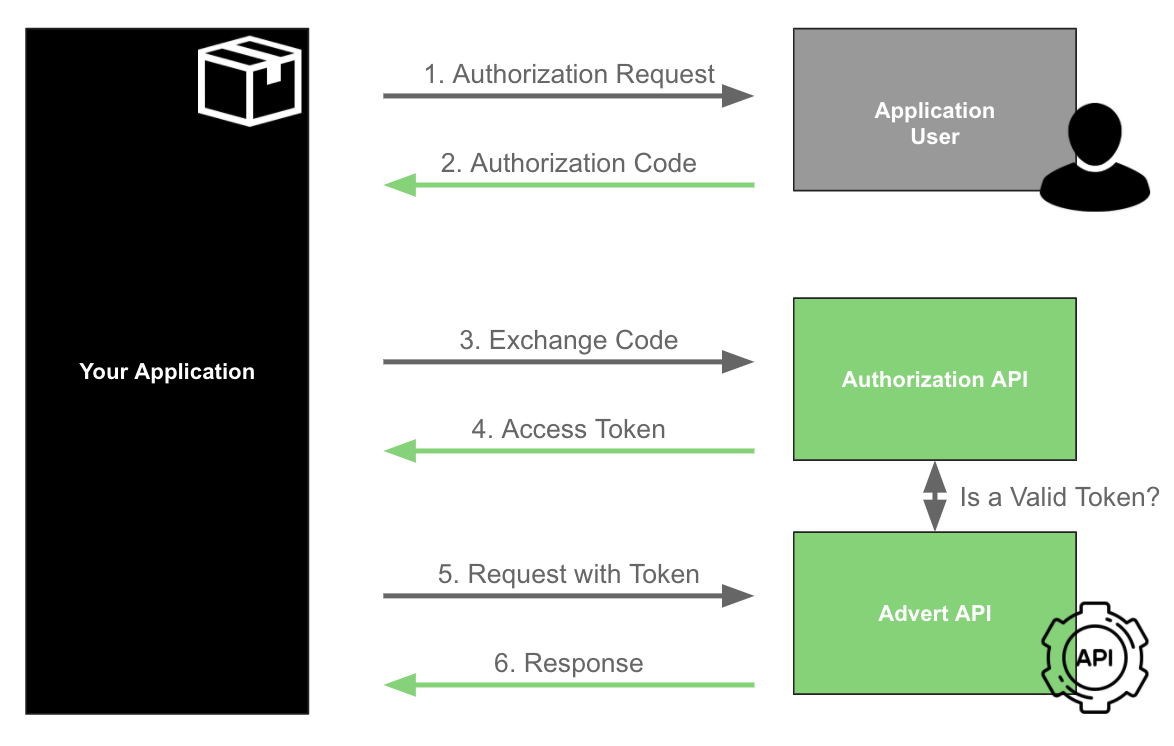
1. User authorizes your app
The Application User accesses the Application (your Awesome App), which redirects him/her to the Site he wants to integrate (such as olx.ro) so that they can authenticate and authorize it to access data on their account and/or execute actions on their behalf.
This is where you should redirect users to the following authorization URL:
HTTP
https://<OUR-SITE>/mercury/authorization/?response_type=code&client_id=<YOUR-CLIENT-ID>&state=<A-USER-ID>
Note that you must include the following parameters in this URL:
| Parameter | Description | Value | Notes |
|---|---|---|---|
| OUR-SITE | URL of the Portal you want to integrate with. | Check in the supported sites which ones are available. | Example: www.olx.ro |
| response_type | OAuth2 response type. | code is the only supported value. | |
| YOUR-CLIENT-ID | Client ID that was provided to you as part of the APP Details. | Random string | Make sure that you have configure the right data for different environments, in case you have an APP for each environment. |
| A-USER-ID | Defined as state. Is referred to the application user internal identifier from your side, as an ID, for example. That will be passed back to you to prevent request tampering (more details below). | Random string | Without this value, you will not be able to automate the process to know the corresponding code for each application user is authorising the APP. |
📘 Redirect URI
The OAuth2 protocol also specifies that a redirect URI can be passed as a parameter. You don’t need to do this because you already provided this URI when you registered your app (in the field Authorization Callback URI in the Application Manager. However, if you do pass it as a parameter, it will be validated against that one. If the base URIs don’t match, your request will fail.
📘 State parameter
The state field should be generated and validated by the Client Application. Its purpose is to help mitigate CSRF attacks. As explained in the OAuth 2.0 RFC, the state must use a non-guessable value and the user-agent’s authenticated state (e.g., session cookie, HTML5 local storage).
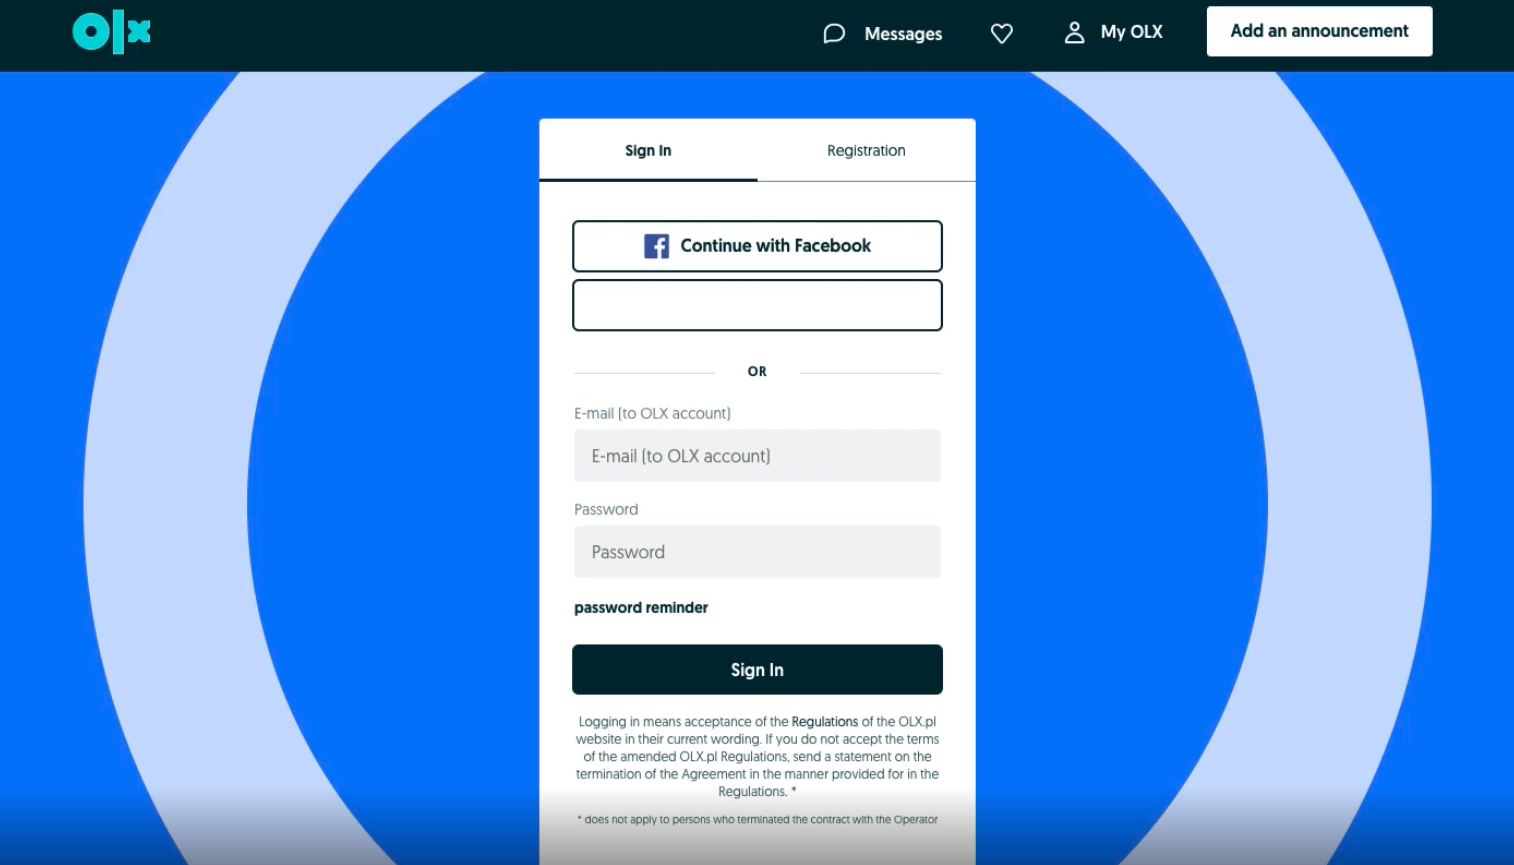
User must authenticate into OLX.
The user has to provide the correct professional credentials to log in. After logging, the Site (OLX ROMANIA, as an example) redirects users to a secure authorization page. On this page, users must grant your app permission to access the private information in their account. If they refuse to grant permission, then they are redirected back to your app.
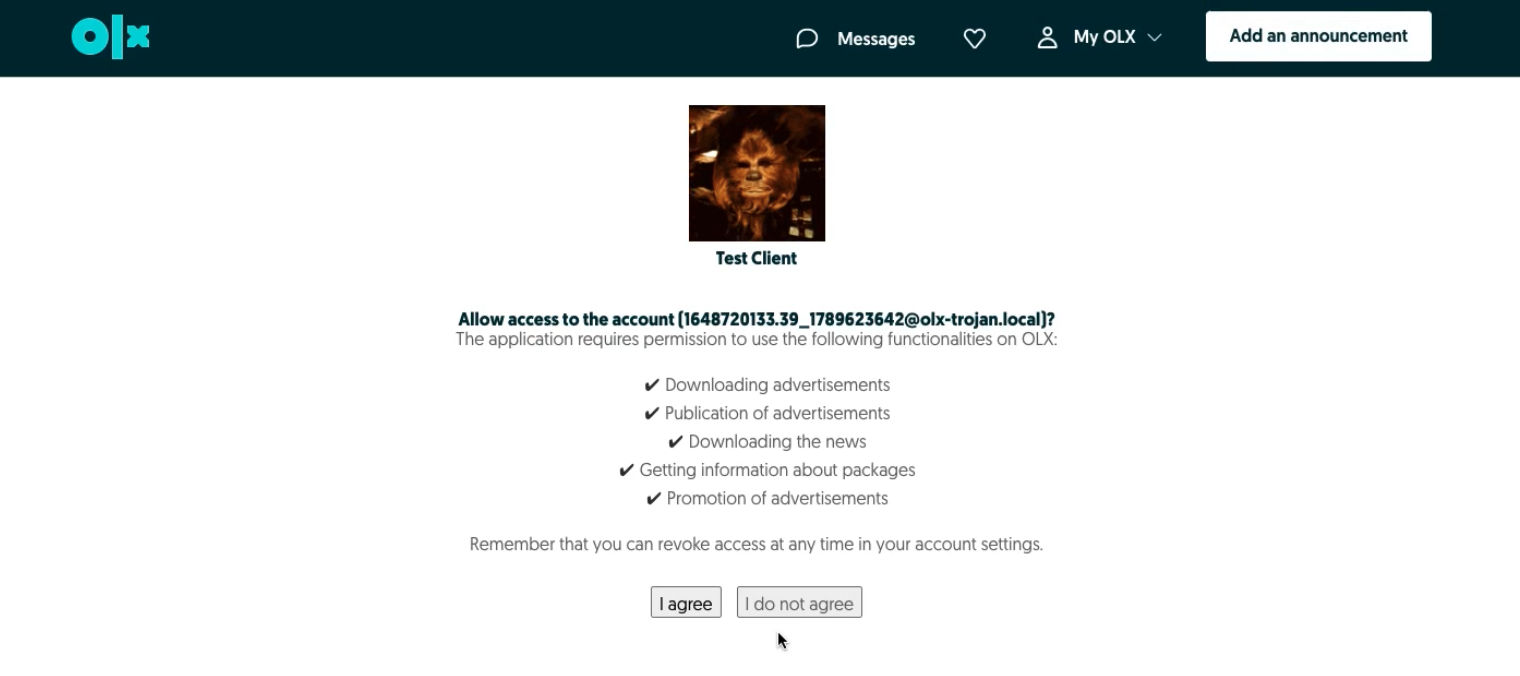
The user trusts the application to access his/her data.
2. Getting the authorization code
After accepting that your application will have access to his/her account on the selected Site, the user will be redirected back to your application (to the Authorization Callback URI specified in your application) with an authorization code and the state previously sent in the request.
302 Found

Location: https://yourawesomeapp.com/redirect/oauth?code=7faf9c72733ad3472963fdb3cb24b94e2f641a06&state=whateverStateYouHaveSentPreviously
Now, you know the client that is authorizing the APP based on the state, and you have his code to request their tokens.
3. Exchange Code for an access token
The user might be done, but you’re not! You must now take this code and exchange it for an access token.
🚧 Authorization code TTL
Don’t forget that the authorization code only lasts 60 seconds. You must request the access token within this timeframe. Otherwise, the user will have to grant your app permissions again.
You can do that by doing a request such as:
curl --location --request POST 'https://api.olxgroup.com/oauth/v1/token' \
--header 'Accept: application/json' \
--header 'Content-Type: application/json' \
--header 'Authorization: Basic <YOUR BASIC CREDENTIALS>' \
--header 'X-API-KEY: <YOUR API KEY>' \
--header 'User-Agent: <CRM NAME>'
--data-raw '{
  "grant_type":"authorization_code",
  "code":"<APP CLIENT CODE>"
}'
To get the BASIC code, please visit Base64 Encode/Decode .
4. Getting an access token for the first time
Here’s an example of what you’ll get from the previous requests:
{
  "access_token" : "a500491037ee99ed8a68fdd5bd1d756940490a19",
  "token_type" : "Bearer",
  "refresh_token" : "bd921d60678b32a31cde526c6e5b658b4ea157ba",
  "expires_in" : 3600,
  "scope" : "read:adverts write:adverts read:leads read:profile_package"
}
Let’s make sure we understand what an Access Token Object is and what properties it has.
| Property | Description |
|---|---|
| access_token | A 41 char alpha-numeric string that grants access to resources with a specific scope from a specific user. |
| token_type | The token type for which we only support Bearer. You should send it in the Authorization Header like so:-H 'Authorization: Bearer {$access_token}' |
| refresh_token | A 41 char alpha-numeric string to be used to refresh the Access Token Object. |
| expires_in | An integer expressed in seconds. It's the TTL for the access_token property. Our access tokens are valid for 3600 seconds (which is 1 hour). |
| scope | A concatenated string of scopes. These scopes grant you access to certain areas of the user account and can be configured in your APP. |
You’re done! With this token object, you’re ready to make authorized requests on behalf of the user.
5. Request with Token
Any request made needs to have a valid token. Learn here which requests are available through the API.
5.1. Refreshing the access token
As you can see in the example above, an Access Token Object has several properties. One of those is the expires_in which is expressed in seconds and describes the TTL of the access_token property.
When you’re making API calls and the access_token expires, a response like the following one is returned with a 403 Forbidden HTTP Status Code:
{
    "transaction_id": "c793460c-f7bc-11e8-a049-4f7b3b284a42",
    "message": "The access token provided has expired"
}
This means you need to refresh your Access Token Object.
To do that, you’ll need to get your last refresh_token and perform the following call to the OAuth API:
curl --location --request POST 'https://api.olxgroup.com/oauth/v1/token' \
--header 'Accept: application/json' \
--header 'Content-Type: application/json' \
--header 'Authorization: Basic <YOUR BASIC CREDENTIALS>' \
--header 'X-API-KEY: <YOUR API KEY>' \
--header 'User-Agent: <CRM NAME>'
--data-raw '{
  "grant_type":"refresh_token",
  "refresh_token":"<PREVIOUS REFRESH TOKEN>"
}'
With that, you’ll have a new Access Token Object with a brand new access_token property and new refresh_token.
🚧 Persisting Access Token Objects
We strongly suggest that you persist your Access Token Objects securely so that you can refresh them whenever needed. Also, remember that each Access Token is issued for a specific application user.
6. Webhook Response
According to the request made, you will receive a notification as a response. There are a few response types, so make sure you Notification Callback URL is prepared to receive them. See Setup notifications for more details about the notifications.