User Authorization
The user authorization process is one of the first things your users will interact with before publishing ads. It’s a great opportunity to make a good first impression.
Luckily, the OAuth2 protocol is widely used nowadays and pretty much all major sites implement this “authorization experience”. We strongly suggest that you do the same in your application since that will lower adoption barriers a lot.
In our Authorization flow explains how the auth process works from a technical point of view. Here we’d like to provide you with a few recommendations for what we consider to improve the user experience.
Allow users to manage their authorization
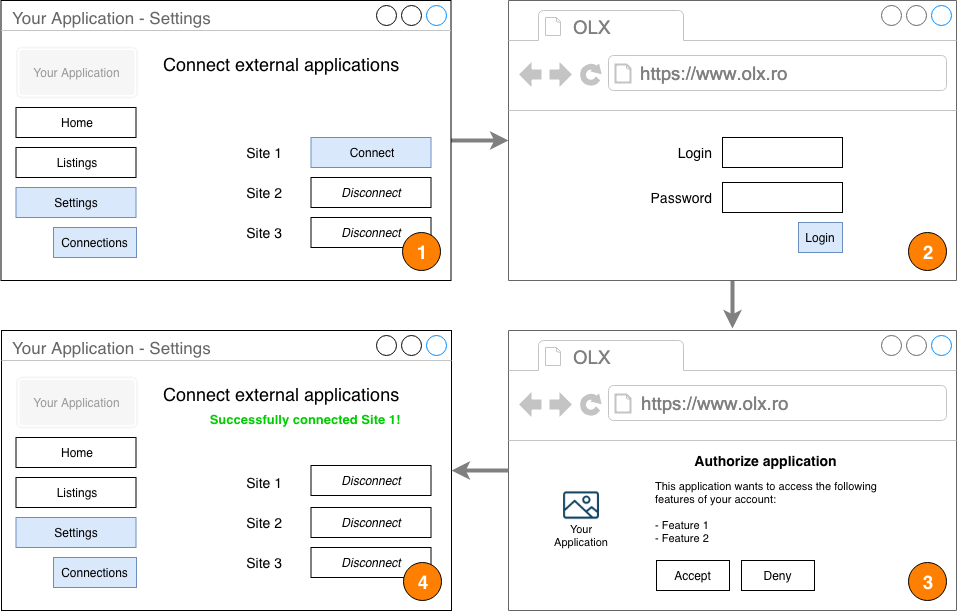
An ideal client implementation of the OAuth2 authorization flow allows users to manage things on their own. This means that somewhere in your “Settings” view, you should implement a button or a link such as “Connect OLX account”, for example.
Typically this type of option is placed under a section named “Apps” or similar, which is preferably easy to find in your application’s settings.
See below a wireframe that illustrates this.

Bring users back to your application after authorizing
The authorization process implies that users leave your application’s context to go to the Site they’re granting permission to. Since they started their journey in your application, it’s only natural that they expect to be brought back to it, as shown in the image above.
To ensure this happens you must provide a redirect_url when first registering your application. This URL should take the user back to the same context in your application where the user started the authorization process (such as the Apps view in your application’s settings).
Handle authorization issues
If somethings’s wrong with a user’s authorization, you should be transparent and handle it gracefully. Such issues will prevent your application from executing any operation that requires an access token. In those cases, you’ll get a response back from the API informing you that the access token is invalid or expired. Here are a few reasons why this might happen:
- User revoked access directly in the Site
- Access token expired and you didn’t refresh it
- Access token expired and you weren’t able to get a new one due to a technical issue
- You lost both the access and refresh tokens due to data corruption
Your application should be prepared to handle these cases in the best way possible.Remember, if an access token expires, you must use the refresh token to obtain a new one. When you do that, you’ll get both new access and refresh token.
It might be necessary to ask the user to grant authorization to his portal account once again. This should be a last resort, though, to avoid user intervention as much as possible. If you need to do it, you should make it clear to the user that he must go to “Settings > Connections” to restore the connection.